The Retag Function in CLASS is designed to fix incorrectly geolocated Services. These are often discovered in reporting processes e.g. a DIY report that shows services without Electoral divisions.
Services are commonly incorrect due to inadequate or incorrect primary address information (e.g. Typos, or inadequate knowledge when a service is first entered etc)
The idea of the Retag function is to first correct the primary address which is attached to the Client Page, then to return to the service, and click the Retag option which will retag the geolocation information on the service. This is because Services are tagged by the primary address at the time of first hitting Save on a new service, or at the time the retag button is pressed.
If correcting, updating or changing the Primary address (from the Client Additional Details Tab) It is highly advisable to always keep former addresses in case mistakes in this process are made, or the former address is still needed. Avoid deleting addresses. To do this, locate the address you want to change from, and simply edit the “Address Type” in the Client Address Details Pop-up, and change it to “Former” and Save. To Change which address is Primary, you will also first need to create the new address, and then click the Primary box of the new address and Save.
Most often, a retag correction would likely be required to the current address. But there may sometimes be a need to correct older services with past addresses. The Retag function can manage this scenario but great care should be taken. The process would be to again preserve the Current address, and then by creating a newly corrected (old) address and marking that temporarily as Primary. Then locating the Service and using the Retag button. Then, it is crucial to return to the Client and change the true current address back again to the primary address. This is so any new services will be correctly stamped upon created in future.
Permissions: it is highly advisable to limit access to the retag Function to Administrators well aware of the consequences these changes can make. For example, without understanding what is happening, it is very easy to accidentally change old services to new addresses.
Firstly a Service is recognised as being incorrectly geotagged. This is usually due to it displaying incorrect geolocation in a DIY report.
Step 1 is locate the service and ensure you are on the Service details Tab.

We can see from the above service the “Retag” button marked in the red box. Before proceding, it is critical to first check that the Current primary address is correct. This is found by checking on the Client page, accesed from the service by clicking the Client name highlighted above in the Green box. Once we have clicked on the Client – Click the Additional Details Tab – shown in Red in the screenshot below:
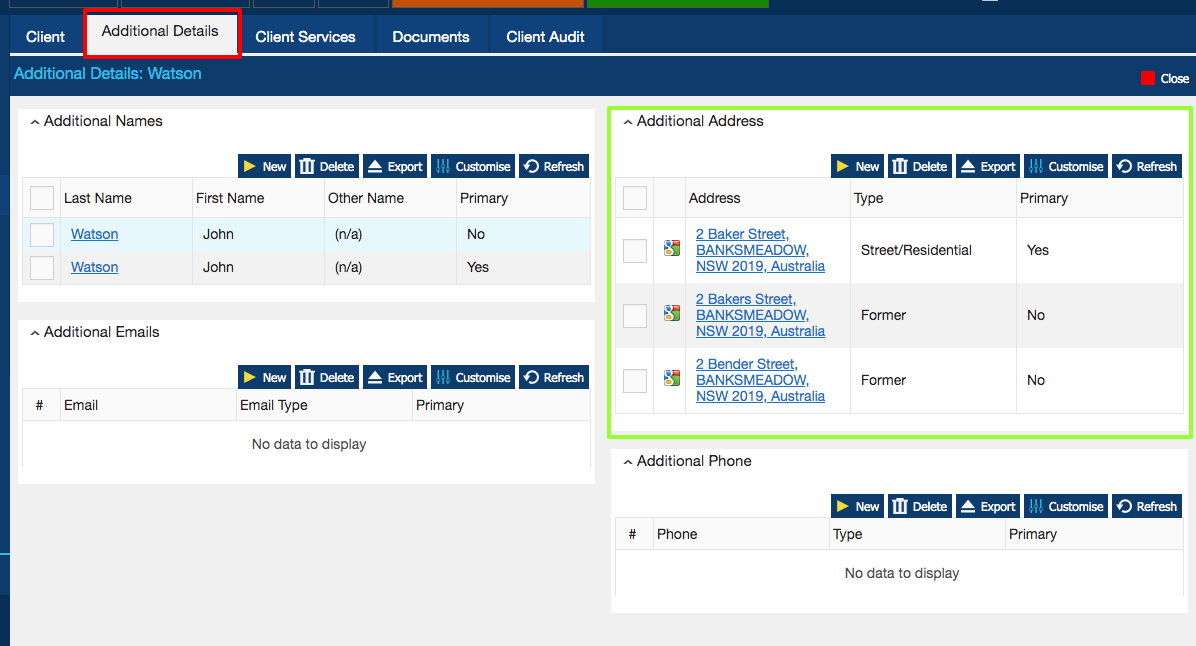
We can see above example there are three addresses in Additional Addresses box – which is highlighted in Green. Significantly the top Address is Marked as Primary = Yes. So retag any services will result in this address being tagged. The middle address is marked by Type = former. It has a slight spelling variation, so may have been fixed at some point. And the bottom of the three addresses is a different street, so this client may have moved at some point.
A common use scenario of retag would be to correct the current address, then retag the services delivered while the client lived at that address. To make this happen, simply click on the current primary address, make the changes and save (or alternatively create a new correct address mark it as Primary, and then go and mark the incorrect one as Type = former). Then return to the Service and retag it. Find any other services given while tje client was at this address and simply click retag on them also.
For the next example, lets go to a slightly more complex scenario – that should illustrate both examples well. Lets make a “fix” to old (former) the Bender Street address, then tag the service (presuming this service was delivered when the client lived at this former address), then return to the current Baker street address by making that Primary after we have finished. This scenario would be required when a Service from some time ago, when the client was living at the old address, was incorrectly tagged.
First – Lets edit the old address and temporarily make it Primary. Begin by Clicking on the correct (last of the three) blue Address link as shown above. We end up on the pop up window below:
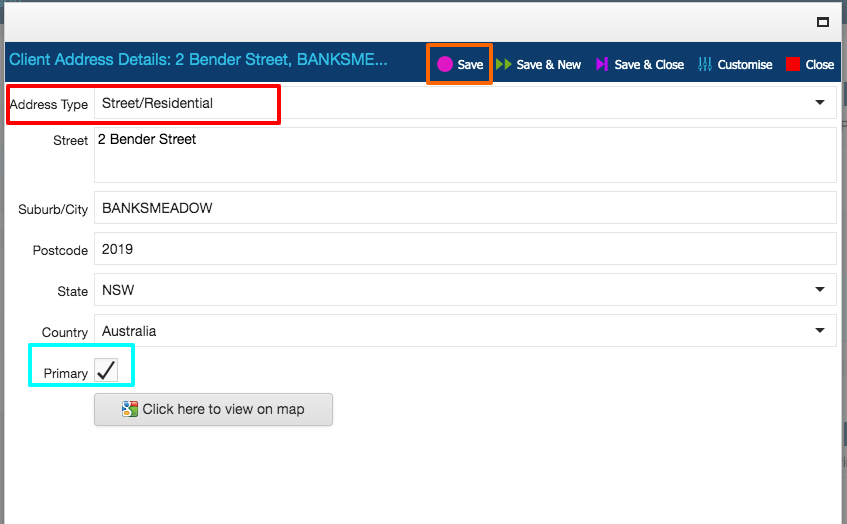
Above we can see The Address Type box, which is changed from former to (usually) “Street/Residential” shown above in the red box. We then Tick the Primary Box shown above in the Blue box. As there can only ever be a single Primary Client address at once, this will also Untick the current Address making it not Primary. We then need to Click Save (orange Box). These edits are now automatically displayed correctly in the Additional details tab, like the screenshot below.

Above, in the red box the Type for the Bender Street address, has now changed to Street/Residential and the Primary has been changed to Yes. In addition the top address (our actual current address) has correctly been changed temporarily to Primary = No. We are now ready to retag the old service. A fast way to head back to the service is to use the correct Orange Service Tab marked in the Blue box in the screenshot above. Make absolutely certain you are returning to the correct service – mistakes can happen particularly if you have multiple services open at once. Confirm the name, and date is the correct service.

After confirming the correct service, Simply click the Retag Button (shown in red box above) and click the confirmation Pop up that says “Are you Sure to retag Service”.
The next step is to Confirm the change has occurred.
At this point it is recommended to close then reopen the service, to ensure the changes have taken affect.
Once the service has reloaded click on the “Service Audit” Tab shown in the screenshot below at the top of the screen marked in the red box:
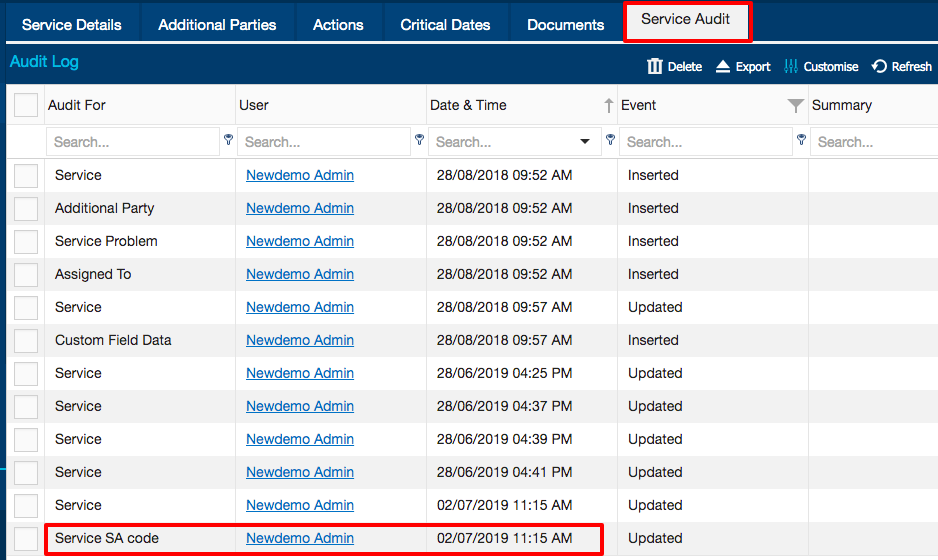
Then locate the latest entry by date and time – shown at the bottom of the above screenshot – with the title “Service SA code” meaning the service had Statistical Areas (SA) codes updated. We can now click on the user name that performed this (in the above example the logged in User was just a test account with the Name “Newdemo Admin”) click on the Blue link, and the result is the list of corrected SA codes:

The above Audit result is a new, highly useful feature that can be used on new records, or retagged records to check that the Administrative boundaries of the service are as expected.
The final step for the above example is to return to the Client and edit the Actual Current address back to primary and Save. You only need to do this if you are following the above example where you are fixing an old service with a corrected old address. It is not a required step if you are updated the current address.