Creating and managing Worker and User accounts

Creating User Accounts

CLCs Australia recommend entering anyone into CLASS who you want to appear in conflict check results. To do so: 

1. Click on System Settings from Step 1 from the primary menu indicated in image below.

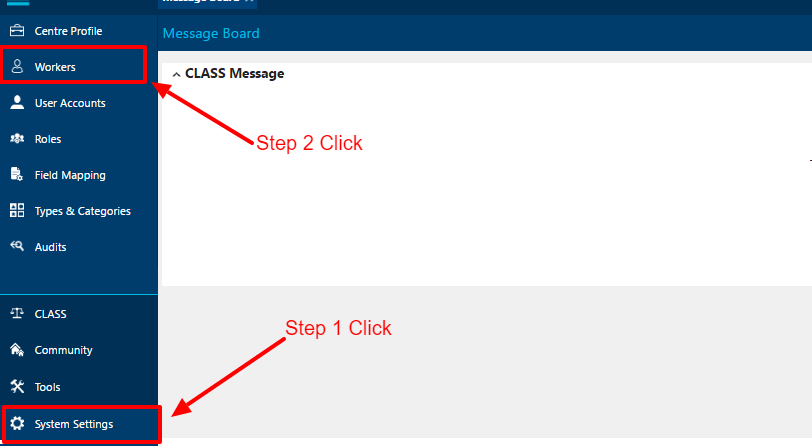
2. Click on Workers on the secondary menu Step 2 indicated in the image above.

3. Select New  from the top right corner of the screen, to create a New Worker. 

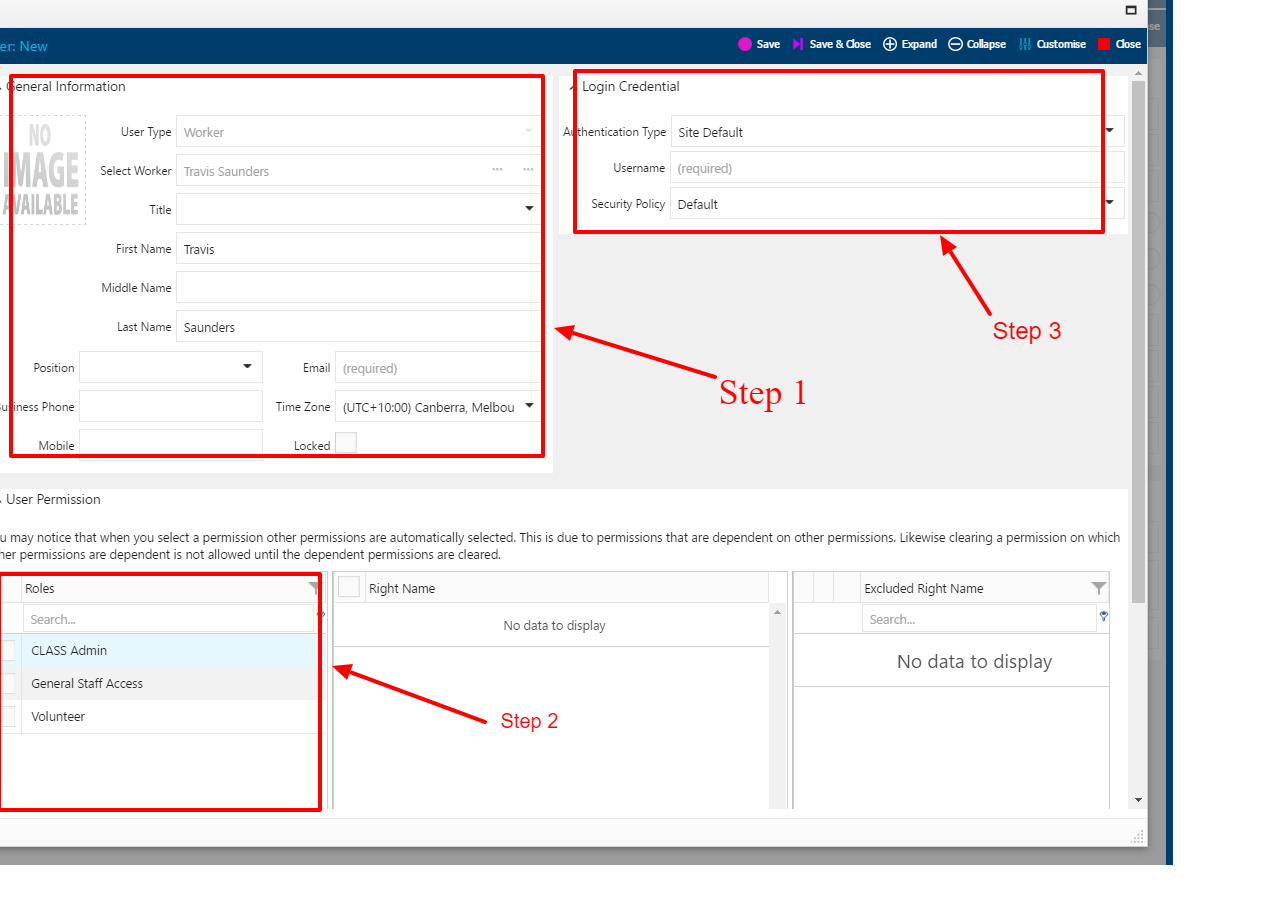
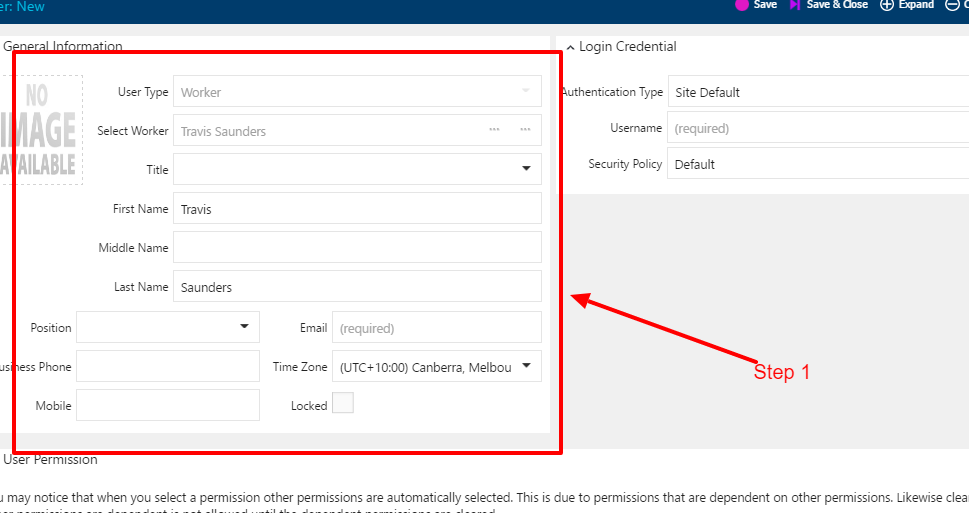
4. The window below will open. Fill in details of the user. Please use formal names and work details ensure any fields with an asterisk or red exclamation mark are filled. Enter in First Name and Last Name, Email and any other details you wish to record in CLASS.

Info

If a person is added in CLASS as a Worker they will appear in the Conflict Check as Type: Worker.

Creating a User Account From A Worker Account

First Step

1. Click on Create System Login within the Worker Account to create the User account.

2. Clicking Create System Login will automatically open the window below with the User Account details.

Fill in the sections as indicated in the image below (Step 1, 2 and 3).

General Information 

4. Enter details in fields indicated Step 1 the mandatory fields ensuring requirements are met. 

User Type and Select Worker fields are a locked field and cannot be edited. 

The Locked tick box means that the account will not be accessible by the user.

Roles 

5. Assign the user with a role by ticking on a tick box .

A majority of users will be General Staff Access role. Please read the Roles section of the Online guide if you are unsure which role to assign a user. THIS IS VERY IMPORTANT!

General Information Important Details 

  1. The email address must be unique to your centre for each user account. 
  2. CLASS no longer has passwords. The password will the password for the Microsoft account associated with the CLASS account. Read more about passwords.
  3. Keep Authentication Type and Security policy as DEFAULT, unless otherwise advised by CLCs Australia helpdesk.
  4. Finally, choose the appropriate role. In this example we chose General Staff Access

6. Fill in the Log in Credentials

  1. The username must match the Microsoft UPN (User Principal Name). Basically, the Microsoft email address associated with the CLASS account. You can read about Azure UPNs, just look for ‘How do I set up new users’.
  2. Unless otherwise advised by CLASS Helpdesk, keep Authentication Type and Security policy as DEFAULT. Note that Supervised User replaces the IP whitelist CLASS historically had. If you want someone to only work from a particular IP address please tick that box and contact the helpdesk to update your Office’s IP Address this is helpful for Volunteers you only want to access CLASS while they are in the office.

7. Click on Save to create the account or Save and New to create an account and then create another user.

You can now inform the user that their CLASS account is ready, forward them the link to CLASS (https://centre.classlaw.org.au), and ask them to try logging in.

Managing User Accounts

Unlocking Accounts and Resetting Passwords

Users are allowed 10 attempts to successfully login. Should they fail an 11th time, the user will be automatically denied anymore attempts for 10 minutes. Their account is locked.

 If a User Account is locked, the CHANGE USERNAME link will NOT be available or appear as an option.

The CLASS Admin can manually unlock the account if required. Navigate to the users account in Users, click on the user’s account name and un-tick LOCKED and Save

Disabling User Accounts

Should you need to disable an account, that is keep the account in the system but not allow the use of the account, un-tick ACTIVE and then save.

1. Locate the user account and open it by clicking on the username 

2. Untick the Active check-box this will deactivate the users account.

Inactive users attempting to log in will see an error message on their login .

Reactivation of the account will involve repeating the steps above and ticking the Active tick box.

Deleting a User Account – Please opt to Deactivate them instead unless the account was never used

Important

Deleting a user account is permanent and cannot be undone. You should only ever delete a CLASS user account if it has never been used.

If you are certain that you want to delete the user account permanently from CLASS, navigate to the User Accounts Menu following the steps above.

Tick the appropriate box next to the user you wish to delete and click delete.

You may want also want to review our page on ‘Accounts Other Settings‘.

Search